
Paint by numbers is calming because it removes the hardest part of making art: deciding what goes where. You simply match a number to a color and fill the shape. When the picture comes from your own photo, the process becomes even more personal—your pet, a family moment, a vacation memory, a favorite place. But photos are full of smooth gradients, tiny textures, and complex backgrounds, while paint-by-numbers templates must be simplified into clean areas with readable labels. If the conversion is done without thought, you end up with a pattern that is frustrating: too many tiny fragments, muddy colors, or outlines that are hard to read.
To get a result that is enjoyable to paint, you need to treat the conversion like a craft project, not a technical experiment. The best templates come from three decisions you can control: choosing the right photo, selecting a realistic level of detail, and printing at a size that keeps everything readable. This guide explains each step in a simple way so you can create a clean template and actually finish the painting.
Choose a Photo That Already Has Clear Structure
Not every photo is a good candidate for paint by numbers. This format works best when the subject is obvious and the lighting is simple. A close-up portrait with soft daylight usually converts better than a wide scene full of textures. If the photo is dark, blurry, or noisy, a converter often mistakes that noise for detail and breaks large areas into many tiny pieces.
A helpful test is to zoom in on your photo and look at the important features. In a portrait, check eyes, eyebrows, lips, and the line of the face. In a pet photo, check the eyes, nose, and edge of the fur. If these details are already unclear at normal zoom, they will not become clearer after conversion.
Pick a Level of Detail That Matches Your Patience
More colors usually mean more realism, but also more tiny regions and more time. For most people, a moderate level of detail creates the best experience. You get depth and shading, but you do not turn the template into thousands of small fragments.
If you plan to print small, keep the template simpler. Small prints cannot handle extreme complexity because the numbers become hard to read and the shapes become too small to paint neatly. If you want high detail, print bigger so those small regions have enough space.
Make Small Photo Adjustments Before Converting
You do not need advanced editing. A few quick changes can improve conversion a lot. Start by cropping tighter so the subject fills more of the frame. Then check exposure. If the image is too dark, brighten it slightly. If deep shadows cover important parts of the face, lift shadows a little so features remain visible.
Avoid heavy filters. Filters often add texture or artificial contrast that becomes unwanted detail in the template. Also avoid strong sharpening. Sharpening can create halos along edges, and those halos often turn into messy lines in a paint-by-numbers outline.
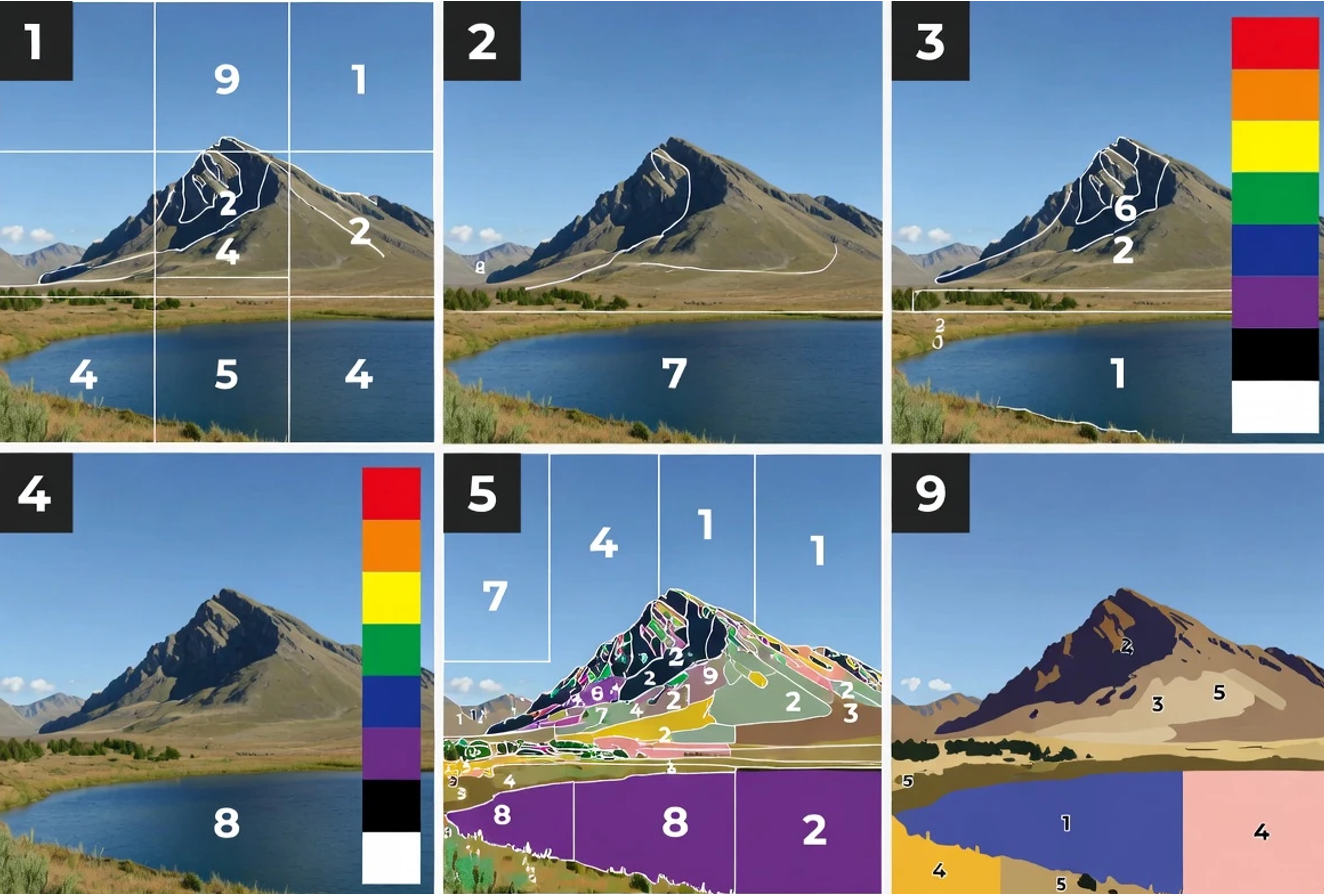
Convert the Photo and Judge the Preview Like a Craft Pattern
When you preview the converted template, do not ask if it looks exactly like your photo. Ask if it looks paintable. Paintable means you can read the numbers, the areas are large enough for a brush, and the subject still looks recognizable. If the background is busier than the subject, simplify the photo instead of increasing detail. Many conversions improve more from a cleaner background than from adding extra colors.
If you want a simple online workflow where you upload a photo, choose a palette level, and export a printable template, you can use a tool that lets you convert photo to paint by numbers online.
Print for Readability (Always Test First)
Printing is where many projects succeed or fail. Before you commit to heavy paper or canvas, do a quick test print on normal paper. This draft shows whether outlines are too light, whether numbers are crowded, and whether tiny regions are annoying rather than enjoyable.
If you can export in a vector format such as SVG, outlines usually stay crisp at different sizes. If you export as an image file such as PNG, choose the highest resolution available so numbers do not become blurry.

Paint With a Calm, Simple Workflow
A simple workflow prevents mistakes and keeps the project relaxing. Many people prefer painting one color at a time because it reduces brush washing and lowers the chance of mixing up similar shades. Start with medium-size areas first. This gives you a feel for the paint and helps you settle into the process. Save the smallest regions for later when your brush control is warmed up.
Most acrylic paints look better with a second coat, especially light colors. Do not worry if the first layer looks streaky. Let it dry and apply another thin layer. At the end, step back and view the painting from a few feet away. Paint by numbers is meant to look best at viewing distance, not under a microscope.
Fix Common Problems Without Starting Over
If the face looks muddy, the template may have too many similar shades. A better approach is often fewer, clearer tones plus slightly higher contrast in the original photo. If the template looks like confetti, you likely have too much detail for the photo or the background is too textured. Cropping tighter and simplifying the background usually helps more than random setting changes.
If the image looks flat, increase detail only a little. Adding a few tones can restore depth without making the template overwhelming. The best strategy is iterative: adjust one thing, regenerate, and preview again.
Finish So It Looks Intentional
When the painting is dry, touch up thin spots and apply a second coat where needed. If outlines feel too strong, you can soften them by carefully painting along edges with a slightly thinned version of the neighboring color. A matte or satin varnish can protect the surface and unify the finish, and framing can make even a simple paper project feel like a real artwork.
Turning a photo into paint by numbers is a form of translation. A real scene becomes simplified shapes, and those shapes become a relaxing sequence of small decisions. When you prioritize readability and paintability, you end up with a template you actually want to finish—and a final piece that feels personal, not stressful.